We will be using these free services: Google Voice, Sipgate, Sip Sorcery and PBXes
NOTE: This guide does work around the one way audio problem on incoming calls too (PBXes part resolves this)
SIP GATE
1. First things we will need to do is to sign-up for a free Sipgate account over atSipgate.com Also be sure to get a phone number; the free account allows you to get one landline number and 60 minutes of free call time (this call time won’t matter since we’ll be bypassing it).
2. After you get your number and account setup, click on the Settings link in the upper right corner of the screen. Then click on the Phone you just created (ie Phone of Jimmy). You will get a list of options.
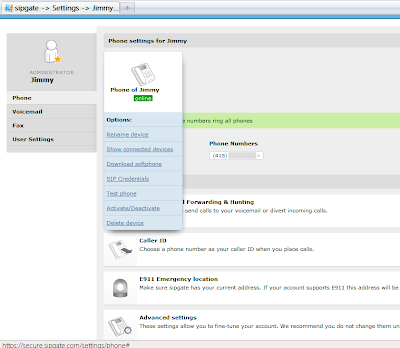
3. Click on the SIP Credentials link. Write down the SIP-ID and SIP-Password (we will need this for sip sorcery).
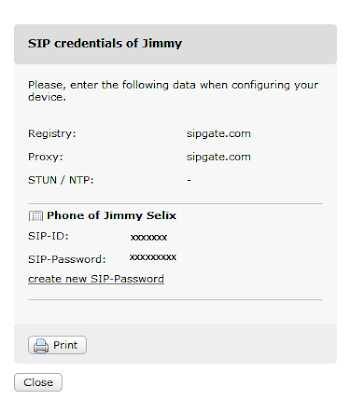
4. We are now done w/the Sip Gate section and really should not need to change any of the accounts default settings.
Google Voice
1. Like it or not, you will need a Google Voice account. Go over tohttp://google.com/voice and sign up for a free voice account. Pick out a local number; this will be our VOIP call number when all things are said and done.
2. Next we will need to add our Sip Gate phone number as a phone to your Google Voice account. We will mark it as a Mobile phone. Now here’s the tricky part; we will now need to either install the Sipgate Phone widget via the sipgate.com site or use the sipgate iphone/ipad client. To verify your sip gate number from google voice, it calls the number and has you enter in the 4 digit pin to verify. I use the sipgate client since we don’t need a mic to talk, just the keypad to enter in the digits to verify.
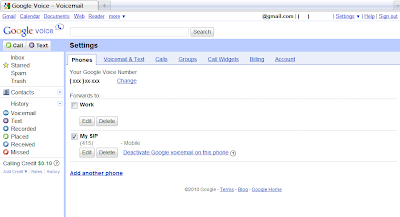
3. Once you have the sip gate number verified and added to your Google Voice account, you can setup the ring schedules under the advanced settings if you want. I turn off caller presentation initially to verify my setup works w/o that added level of complexity.
4. Once your settings are as you want them and the Sip Gate number is verified and added, we should be done w/Google Voice for now.
Sip Sorcery
1. Next, head on over to sipsorcery.com and sign up for a new account. I personally try to use the same accounts usernames for each provider to simplify things (be warned, not the most secure method though).
NOTE: you will need the Microsoft Silverlight browser plug-in installed to use the portal.Get it here.
2. After your signed up and verified, login to the Sip Sorcery Portal.
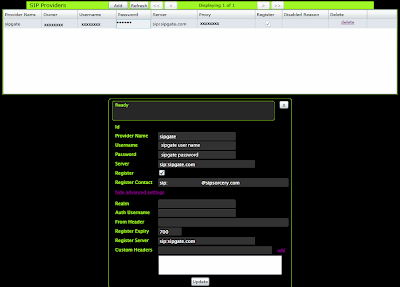
3. Go to the SIP Providers menu and click on the Add button.
Enter in the following:
Provider Name: sipgate
Username: your sipgate SIP-ID, that we wrote down ;)
Password: your sipgate SIP-Password
Server: sipgate.com
Register: check it
Then click on Update. You should now see a SIP Provider Registrations listed at the bottom.
4. At the top, click on Dial Plans. We only need to make an outbound dial plan. Here is the code i have used from the google code page found here.
Give the dial plan a name of: Simple and set Script Type as Ruby. Next, copy the following below or use the link above and paste the code into the bottom box.
You will need to update the first four boxes with our information (AREA_CODE, GV_User, GV_Pass and CB_Number). Click Update to save the changes.
# Copyright(c) 2010 Mike Telis
# Licensed under the Apache License, Version 2.0 (the "License");
# you may not use this file except in compliance with the License.
# You may obtain a copy of the License at
# http://www.apache.org/licenses/LICENSE-2.0
# Unless required by applicable law or agreed to in writing, software
# distributed under the License is distributed on an "AS IS" BASIS, WITHOUT
# WARRANTIES OR CONDITIONS OF ANY KIND, either express or implied. See the
# License for the specific language governing permissions and limitations under
# the License.
# Click "View raw file" in the lower right for the best copy/paste view
AREA_CODE = 'xxx' # my area code
GV_USER = 'username@gmail.com' # my GV e-mail address (user@gmail.com)
GV_PASS = 'gmail password' # my GV password
CB_NUMBER = '415xxxyyyy' # my 10-digit SIP Gate number (only one)
#
SPEED_DIAL = { # my speed dial numbers
'411' => '8004664411', # Google 411
}
#
begin
sys.Log "** Call from #{req.Header.From} to #{req.URI.User} **"
#
if sys.Out # if outbound call
num = req.URI.User.to_s # Get a string copy of the number to dial
#
num = SPEED_DIAL[num] || num # Substitute with speed dial entry, if any
#
case num
when /@/ then sys.Dial num # URI dialing
when /^[2-9]\d{6}$/ # Local call, 7-digit number
num = '1'+ AREA_CODE + num # prefix it with country and area code
when /^[01]?([2-9]\d{9})/ # US number with or without country code
num = '1' + $1 # add country code and truncate number to 10-digit
when /^(011|00|\+)(\d{10,})/ # international number
num = '+' + $2 # GoogleVoiceCall works with '+' prefix only
#
else sys.Respond 603, 'Wrong number, check & dial again'
end
#
sys.Log "Calling #{num} via Google Voice"
sys.GoogleVoiceCall GV_USER, GV_PASS, CB_NUMBER, num, '.*', CB_NUMBER =~ /^1747/ ? 7 : 1, 30
#
else # sys.Out
sys.Dial "#{sys.Username}@local"
end
#
rescue
sys.Log("** Error: " + $!) unless $!.to_s =~ /Thread was being aborted./
end
5. Finally, click on the SIP Accounts and then the Add button.
Enter in your sipsorcery user name and password.
Choose our outbound dial plan called: Simple
Leave the inbound dial plan blank and then click Add.

We should now be done with our Sip Sorcery Part. Lastly….
PBXes
Most people that are in the know are wondering why we need PBXes for what we want to do. A few of us have had problems with one way audio/calls and using PBXes as our first entry point seems to resolves this issue. I know it has solved mine that I was having w/incoming calls not able to hear me but i could hear them and outgoing calls doing the same.
1. Again, sign up for another account over at pbxes.com
The free account will get us a nice ole 2000 minutes of free call time.
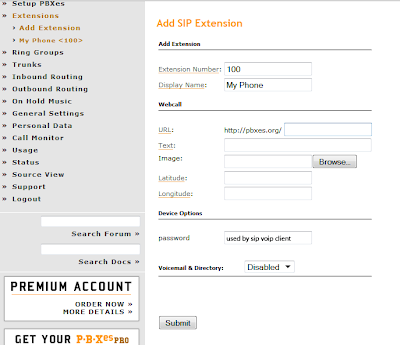
2. Once we are signed up, verified and logged in. We will get our Setup PBXes menu on the left pane of our browser. Click on Extensions and then click Add Extension.
Choose SIP Extension.
Fill in just these fields:
Extension Number: 100
Display Name: My Phone
Then click on Submit. You will see a red box at the top to save all changes; we will do this once we are all finished.
3. Next, we will need to create a Trunk. Click on Trunks and then Add Trunk and SIP Trunk.
Fill in the follow fields and once done, click on Submit Changes (again, note red banner at top).
Trunk Name: sipphone
username: sipsorcery username
password: sipsorcery password
SIP Server: sipsorcery.com
register: yes (inbound and outbound calls)
Outbound Caller ID: Your google voice number

4. Next, we need an inbound route, go to Inbound Routing and Add Incoming Route.
Fill in the following and click Submit once your done.
Extension (both regular and after hours): My Phone
Regular Hours: *
Days: *
Regular Hours: *
Days: *
Regular Hours: *
Days: *
No Override: Checked

5. Next, the outbound route, go to Outbound Routing and Add Outbound Route.
Fill in these fields and click Submit Changes when done:
Route Name: sipgate
Trunk Sequence: SIP/sipphone (click on it and then click add)
Valid for all number: Checked

That should complete the PBXes part. The last part will be configuring our SIP Client. Below is an example on how to setup Softphone, a SIP Client for the iPhone/iPod/iPad (retail) by Acrobits.
1. Tap on Settings > SIP Accounts > + sign to add.
2. Choose Generic SIP Account
Fill in the following and then click Save:
Title: name of account (ie PBXes)
Username: username-100 (your pbxes.com username w/the -100 extension we created)
Password (the password we created for the -100 extension in pbxes)
Domain: pbxes.com
Leave rest at default values.
Once your account is created, click on it and go to Advanced Settings. Fill in the proxy with: pbxes.com (i leave the transport protocol at tcp).
Listening port: 5060
Rest at the default values
Finally, time to test! I’ve noticed that reliability of incoming calls are not the greatest so this is NOT a replacement for a main phone line but more an alternative to having a second line or a way to utilize calling on a voice only plan (ie the iPad’s unlimited data).
NOTES/HINTS/TIPS:
-this worked on my macbook pro and win7 pc using the Softphone SIP Client and also on my iPad and iPhone 3GS (both using the iPads microsim data plan and Acrobits Softphone client).
-for a few days, i had problems with calls not making it to my devices. this appeared to be a problem on pbxes.com’s end. sometimes you will have times when things don’t work.
-if your behind a firewall, you will need to open up traffic to the 5060 port for devices on your local network making SIP/VOIP calls
-911 DOES NOT WORK, you can pay to get E911 service but it does require a monthly subscription fee. More info .
-Lastly, YMMV or so it seems. There are a lot of factors that can come into play when trying to do what we are doing: getting voice calls via a data only connection without a dedicated pbx.


